Thursday, December 8, 2011
Link Dump, 2
Welcome Preppers and Survivalists,
For what it's worth.
Journey To Forever.org: Small Farms - Agrodok Publications
http://journeytoforever.org/farm_library/agrodok.html
Agromisa - Publications
http://www.agromisa.org/index.php?PageId=139
Note:
Checkout the AgroPosters and the Agrodok Series
Journey To Forever.org: Small Farms - Raising catfish in a barrel
http://journeytoforever.org/farm_library/Raisingcatfishinabarrel.pdf
Journey To Forever.org: Small Farms - Classic Manuals Online
http://journeytoforever.org/farm_library/cd3wdbooks.html
Journey To Forever.org: Small Farms - Better Farming Series (FAO)
http://journeytoforever.org/farm_library/faobetfarm.html
Journey To Forever.org: Small Farms - Library Contents
http://journeytoforever.org/farm_library.html
Saturday, December 3, 2011
Its Not That Easy (Food Storage), Part Three
Dear Preppers and Survivalists,
Remember me telling you about that chore I've needed to do these past two months.
Well, it didn't get done so you'll have to come back later this weekend to read this Saturday's article because I have to do it now ; - )
Saturday, November 19, 2011
It's Not That Easy (Food Storage), Part Two
Dear Preppers and Survivalists,
From the last article, you will notice that I stored the dried beans differently then I did the sugar. There is a reason for that. We are having a problem with finishing an entire 5-gallon bucket of food, in a timely manner.
Normally, I'll open a 5-gallon bucket of rice, and we'll cook with the rice. Well, the last time I did that; it took us about one year to eat all that rice. We are also having a problem finishing a 35-pound (5-gallon bucket) of sugar. My wife isn't making as many cookies as she has in the past.
So,
We decided to start packaging some of our long-term food storage in smaller five-pound mylar bags. The smaller bags will allow us to eat our food storage and still keep most of it properly packaged.
But,
There is a down side to this. A five-gallon plastic bucket will hold less food when packed with small bags. Normally, a five-gallon bucket will hold 35 pounds of food, in a big mylar bag. Using the smaller five-pound bags, a five gallon bucket will only hold 25-pounds, a reduction of 10 pounds.
This reduction will increase the storage costs of your food. Instead of ten buckets for 350 pounds of wheat, you will need fourteen buckets. If you're paying $10 for a plastic bucket and lid, your food storage cost will go up $40.
Ouch!
But, there is an advantage to using smaller bags. Food in a smaller bag is easily carried by a child. Plus, it is easier to divey up for trade.
Note:
I disagree with Mr. Rawles about charity. I believe in trade.
I also made a mistake in my last article "It's Not That Easy (Food Storage)" I forgot to mention that I labeled each bag with the type of beans the mylar bag contains.
More later.
Links:
GSIEP - Storing Sugar Using Plastic Buckets
http://gsiep.blogspot.com/2011/02/storing-sugar-using-plastic-buckets.html
GSIEP - Technical Tuesday: 20 September 2011
http://gsiep.blogspot.com/2011/09/technical-tuesday-20-september-2011.html
Wednesday, November 16, 2011
Occupy Wall Street's Statement of Principles
Welcome Preppers and Survivalists,
One of the great things about the occupy movement is its willingness to include other groups and their ideas. In that spirit, I would like to suggest this be included in y'all's statement of principles.
From Ought Six, a forum member of This Blue Marble, writing about Veteran's Day.
I have the right to live,
thus I have the right to defend my life from attackers who would take it from me.
I have the right to my private property,
thus I have the right to defend my property from thieves who would take it from me.
I have the right to self-determination,
thus I have the right to defend my liberty from tyrants who would take it from me.
The only usable tools for these tasks are guns,
and thus I have the right to shoot anyone who would take my guns from me.
Saturday, November 12, 2011
It's Not That Easy (Food Storage)
Dear Preppers and Survivalists,
First, I have been working on getting more pictures, and writing a little bit more, for the series of articles titled "It's Not That Easy (Shelter)" but I'm getting a little bit burnt out.
So, I am going to write a couple of articles about food storage.
Before we begin, I need to ask a question.
Are we in the beginning stages of a crisis?
If we are, I want you to get all your food first. Remember, food first. Once you have your food, I want you to buy the mylar bags, oxygen absorbers, and plastic buckets to properly store your long-term food storage.
With that said, let's begin.
Gather Your Supplies
For this project, you will need ...
1 - Plastic Bucket or Cardboard Box
2 - Mylar bags
5 - Oxygen Absorbers
1 - pair of Scissors
1 - clothes Iron
25 pounds of dried beans
Time to Think
Next, as always on prepping, you are going to have to make some decisions.
What kind of dried beans are you going to store? Chickpea (Garbanzo), Black (Turtle), Small Red, Green Lentils (Split Pea), Lima, Great Northern, Pinto, Brown Lentil, or ...
What size bag are you going to use? I suggest cutting two big bags into eight smaller bags. Each smaller bag will hold about five pounds of beans.
Lastly, are you going to store your food in plastic buckets or cardboard boxes? Plastic buckets are rugged, but they cost more, up to $10. A cardboard box is easy to find, but mice can chew through it.
Getting to Work
 |
| One Plastic Bucket with Lid, Five Mylar Bags recently cut down, and 25 pounds of beans |
At the time of this picture, I did not have any fresh oxygen absorbers, but I sealed the bags anyway then waited for my order of oxygen absorbers to arrive.
Remember, get your food first then the storage material.
 |
| Five Pounds of Beans and One Mylar Bag |
Because I wanted to make sure I had 5-pounds in each mylar bag, I kept the plastic bags until the mylar bag was full. Once I checked the number of plastic bags, I filled the next mylar bag.
I'm crazy like that.

To seal the bags, I take a bath towel and place it on a hard surface, then place the mylar bag on the towel and iron a 1-inch seam at the very top of the bag.
Once all the bags are sealed, I placed them in a 5-gallon plastic bucket.
Using this method, allows you and your family to store 25-pounds of beans in a plastic bucket.
Update: 12 Nov 2011
I forgot to mention that I write the type of bean, that's in the mylar bag, on the 1-inch seam. This helps identify what's in the mylar bag without opening the bag.
Where to Get Your Supplies
I bought my beans at a local grocery store. The beans were on sell for about 75¢ per pound. My buckets, I buy from a secret source. (They have asked me not to reveal the company's name) Lowe's has food grade plastic buckets for about five dollars. If you can't stand logos on your buckets, US Plastic has appropriate buckets for sale. You can also find food grade buckets for free to cheap at local restaurants and bakeries. The mylar bags and oxygen absorbers I used were purchased from Walton Feed, and/or Nitro-Pak.
Options
The first option is to store your long-term food storage without oxygen absorbers. You can do this, but the shelf life of your food will decrease. Instead of 30 years, the food's shelf life will be reduced to, say, 5 to 8 years.
The next option is to store your food without mylar bags, but the food's shelf life will be reduced even greater, say, 1 to 3 years.
Why so much shorter?
The mylar bags protect the food from moisture and oxygen. Moisture and oxygen will easily go through a plastic bucket. The oxygen absorbers remove the oxygen that oxidizes the food. The absorbers also kills the bugs and microorganisms that destroy your food, in storage.
The third option is to store your food in mylar bags with oxygen absorbers in a cardboard box, (The Latter-day Saints do it this way) but you will have to protect the boxes of food from mice and other varmints.
Lastly, you and your family can place your food in mylar bags and add oxygen absorbers, later, like I did. Just seal a very small seam (about an 1/8 of an inch) at the top of the mylar bag. Once you get your oxygen absorbers, cut the small seam off, add the absorbers, and reseal an 1-inch seam with an iron set on medium heat.
Link:
GSIEP - Technical Tuesday: 20 September 2011
http://gsiep.blogspot.com/2011/09/technical-tuesday-20-september-2011.html
Saturday, October 15, 2011
It's Not That Easy (Shelter), Part Four
Dear Preppers and Survivalists,
Move along! Nothing to see here.
(Unless you want to read more on "It's Not That Easy (Shelter), Part Three" because I added more of my thoughts.)
But, there is a lot to see on YouTube!
Link:
YouTube.com: Southern Prepper 1 - Retreat Security
http://www.youtube.com/watch?v=Dn4q1uSITKU
YouTube.com: Southern Prepper 1 - Trip Wire Alarms for Retreat Security
http://www.youtube.com/watch?v=QMB4m41IXfA
YouTube.com: Jacquesthejoc - How to Make a Tripwire Alarm
http://www.youtube.com/watch?v=qWi3aFaPWnk
YouTube.com: Nextracker - How To Make a Rat Trap Security System
http://www.youtube.com/watch?v=YF9X_ibIVmk
Lastly, I support the folk at the various Occupy (as in Occupy Wall Street) demonstrations throughout the country. They are making their voices heard.
But,
We are going to have to be careful.
Link:
Sharp as a Marble - Some of These People Mean to do You Harm
http://blog.robballen.com/2011/10/14/p5171-some-of-these-people-mean-to-do-you-harm.post
OK. Before I go, a link to a funny video in the spirit of "It's Not That Easy (Shelter)."
Link:
YouTube.com: ECRaoul - How to Build a Bunker
http://www.youtube.com/watch?v=fGngh5nHtrk
Saturday, September 24, 2011
It's Not That Easy (Shelter), Part Three
Dear Preppers and Survivalists,
Before we begin, I have something to say.
I talked with my brothers, and they suggested that I stick to defensive operations (How to protect yourself) and stay away from offensive operations (How to attack other people).
Just so you know.
As always, the first priority in survival is thinking, so we have to have a plan.
First, take a big sheet of paper and draw a picture of your home's layout. Next draw in your yard then draw in everything else out to 600 yards.
The picture to the right is a general layout of our home, its yard, and everything out to 600 yards.
Why 600 yards?
Because, you should be able to shoot that far. Yes, even with an AR-15 rifle
Next, you mark on the paper all the dead space within that 600 yards.
Needless to say, I have a lot of dead space around my family's home; most of that dead space, I can do nothing about! : - (
But the dead space that I can do something about, I will so something.
As suggested earlier, I can fill in some of the dead space with soil, bring it up level with the surrounding area, so no one can hide in the shallow area
Another suggestion is to plant prickly plants, like roses, thorny blackberry bushes, or cacti. This method is similar to those suggestions about improving the security of your home. But, Remember! You still have to be able to see into those areas.
Another suggestion is to place a solar-powered electric fence in those dead space areas.
Next, I am going to come up with a plan for wire obstacles.
Slow 'em Down
One possible obstacle, I didn't mention earlier, is the common chain-liked fence. It is seen throughout these United States, so no one will notice it, especially in older neighborhoods.
My suggestion/idea is to install a four feet high fence around the front yard, anyone trying to get into the yard must go through the gate or hop the fence. Making them noticeable and slowing them down.
The possible cover story for this obstacle is 'I want to keep the children/dog from going out into the street.' Plus, you can see folks (and any possible threats) through the fence.
Note: Needless to say, once bad times happen, you and your family add barbed-wire or concertina wire to the top of the fences.
Along the back property line is a six-feet high chain-linked fence. It is a lot harder to jump over in one easy motion.
Remember! Obstacles slow down the attacker making them easier to hit with rifle fire.
Now, for you folks on some property, and a little cash, I'm going to tell you the second reason behind wire obstacles.
Channel the Villains
As you plan where your obstacles are going to be placed, in an emergency. Try and cause any villains to be directed into the areas where you and your family will have the best observation and most accurate fire.
As you can see from the design of our home, we don't have windows on all sides of the house, so we will need to either knock a hole in the wall or design our wire obstacles to channel the villains to the areas with windows.
Remember!, Remember!!, Remember!!! (I really mean REMEMBER!!!)
An obstacles with no observation on the obstacle is easily reduced (Reduced is military speak for went around, bypassed, ignored, removed, destroyed, ...)
But I Live in the 'Burbs
Now, most folks are going to speak up and point out that they live in the suburbs. Their neighbors' homes are less than 50 feet away.
You guessed it! You and your neighbors are going to have to band together. You'll have to string wire, post guards, run patrols, ... Basically, you and yours are going to have to form a militia.
Will Never, Ever Happen. Well, It Might Happen ...
because it has happened in the past, the recent past.
Ok, here's where I start writing about the crazy sh*t.
Your wire obstacles should be designed to stop villains from getting within 35 meters (38 yards), so they can't throw hand grenades or fire bombs into your home's windows.
Wire obstacles are also used to keep friendlies from accidently wandering into your minefields. The friendly side of the mine field and the minefield's sides are fenced with barbed-wire or concertina wire. Only one side (the side towards the villains) is open this allows the villains to walk into the minefield with no warning.
I have something to say, but I haven't figured it out, yet. So no blah, blah, blah for now.
In conclusion, obstacles are designed to do two things, slow down villains and channel them into your fields of fire.
Link:
Seton Hall University - FM 7-8: Infantry Platoon and Squad
http://www.shu.edu/offices/upload/FM-7-8.pdf
General Dennis J. Reimer Training and Doctrine Digital Library (RDL) - FM 3-21.8: The Infantry Rifle Platoon and Squad
https://rdl.train.army.mil:443/soldierPortal/atia/adlsc/view/public/23583-1/FM/3-21.8/FM3_21X8.PDF
U.S. Marine Corps - FM 20-32 Mine/Counter Mine Operations
http://www.marines.mil/News/Publications/ELECTRONICLIBRARY/ElectronicLibraryDisplay/tabid/13082/Article/125665/fm-20-32-wch-1-4.aspx
Wired.com: Danger Room - Video: Troops Fend Off Kabul Attack, Launch P.R. Counterstrike
http://www.wired.com/dangerroom/2011/09/video-taliban-counterstrik/
Note: I linked to this video to illustrate how folks will improvise shelter/defensive structures from available material.
Home and Garden Television - How to Add Security Plants to Your Yard
http://www.hgtv.com/gardening/how-to-add-security-plants-to-your-yard/index.html
Home Security Advice.com - Securing Your Home With Plants, Trees & Shrubs
http://www.homesecurityadvice.com/tips/secure-plants-trees.html
The Gentle Survivalist - Home Security and Perimeter Protection
http://site.infowest.com/business/g/gentle/pp.html
Garden Guides.com - List of Flowering Plants With Thorns
http://www.gardenguides.com/83986-list-flowering-plants-thorns.html
Wikipedia - Molotov Cocktail
http://en.wikipedia.org/wiki/Molotov_cocktail
Note: Vyacheslav Molotov, the great Bolshevik, is credited with inventing the Molotov Cocktail ; - )
Saturday, September 17, 2011
It's Not That Easy (Shelter), Part Two
Dear Preppers and Survivalists,
In most disaster situations (90% to 95% of them), a typical stick-built home will be fine, if alternative water, heating/cooking, lighting, and sanitation plans are in place. These alternate plans should cover a disaster with and without electricity.
However, there is the possibility that groups of villains will attack you and your family's home to take your preps. Last week's article covered some long-term ideas for your home to protect your family.
But,
What can you do outside of your home to slow down your attackers?
First, you can eliminate dead space. Dead space is any place that can not be covered by a firearm's fire. Dead space can be a low spot in your yard or a ditch, or it can be behind a thick tree or behind a gardening berm.
Yea, dead space can be behind your garden's raised beds that your husband built for you last summer.
Now, the best method of eliminating dead space is for you and a partner to identify those areas of dead space.
Basically, one person gets into the shooting position and the other person walks in the area covered by that shooter. Any area in the yard that the shooter can not see the walker's shins is dead space.
Once any dead space is identified, it is filled in with dirt, removed, or remodeled as needed.
If you can not fill in or remove the dead space, you are going to have to come up with a plan of dealing with the dead space during an attack.
After eliminating dead space, the next thing you can do is to put in obstacles.
Before I begin, Remember!
the "All Obstacles Must Be Observed" rule.
The first set of obstacles, I am going to write about, are wire obstacles; they can be made out of smooth wire, barbed wire, or concertina wire.
Smooth Wire
 |
| Students pulling a 'patient' through a wire obstacle during an U.S. Air Force Phoenix Raven Class by Tech. Sgt. Scott T. Sturkol |
Ya, ya... I know the picture shows barbed wire, but the picture was the best I could find for tangle foot. Plus, the picture shows what could happen if the tangle foot is placed too high.
Another obstacle that smooth wire is used for is an electrified fence. The electric fence wire is placed on wooden or metal fence posts, with insulators, just like a barbed wire fence then electrified.
Barbed Wire
 |
| Fence and Bog Pool, Pringle's Green by Chris Eilbeck |
Mother Earth News has an article that gives great advice on How to Build a Barbed Wire Fence.
But, this post is about wire obstacles.
Several years ago, I came across an article, by an United States Army combat engineer. The article dealt with secretly building a wire obstacle. The author suggested that a combat engineer first build a typical barbed wire fence. Just like you, the enemy wouldn't notice a 4 to 6 strand fence running across a field. Once it got dark or the enemy was heading that way, a group of soldiers would add the single or double aprons to the fence.
Concertina Wire
 |
| Soldiers of the 1st Battalion, 325th Airborne Infantry Regiment, breach a concertina wire obstacle by Specialist Henry |
To cut the inner wire, you will need more than an ordinary wire cutter. The soldiers in this picture are using bolt cutter to cut through the concertina wire.
Did I tell you, it's tough and sharp, very sharp.
OK. This finishes the general descriptions of the types of wire used in wire obstacles. Hopefully, I'll have some information for you about using this stuff, this Saturday.
Link:
The Free Dictionary - Dead Space
http://www.thefreedictionary.com/dead+space
Defense Technical Information Center (DTIC) - JP-315: Barriers, Obstacles, and Mine Warfare for Joint Operations
http://www.dtic.mil/doctrine/new_pubs/jp3_15.pdf
Note: This is a 'big picture' military publication
On Violence - If An Abatis Falls in a Forest, But the Enemy Didn't Observe It, Did It Really Happen?
http://onviolence.com/?e=194
Note: This article argues against the "All Obstacles Must Be Observed" rule.
Global Security.orgy - FM 5-102: Countermobility
http://www.globalsecurity.org/military/library/policy/army/fm/5-102/index.html
Reimer Digital Library - FM 3-21.8: The Infantry Rifle Platoon and Squad
https://rdl.train.army.mil/soldierPortal/atia/adlsc/view/altfmt/23583-1
Global Security - EN0065: Field Fortifications
http://www.globalsecurity.org/military/library/policy/army/accp/en0065/index.html
Global Security - Army Correspondence Course Program (ACCP)
http://www.globalsecurity.org/military/library/policy/army/accp/index.html
Note: A collection of these United States Army correspondence courses. They cover a wide range of self-study courses
Wikipedia - Agricultural Fencing
http://en.wikipedia.org/wiki/Agricultural_fencing
Wikipedia - Barbed Wire
http://en.wikipedia.org/wiki/Barbed_wire
Mother Earth News - How to Build a Barbed Wire Fence
http://www.motherearthnews.com/do-it-yourself/barbed-wire-fence-zmaz84zloeck.aspx
American Fence and Supply - Building A Fence With Gaucho® High Tensile Barbed Wire and Field Fence
http://www.afence.com/BekaertBrochure.html
Wikipedia - Concertina Wire
http://en.wikipedia.org/wiki/Concertina_wire
Saturday, September 10, 2011
It's Not That Easy (Shelter)
Dear Preppers and Survivalists,
The other day, I was watching the news, and a commentator was reporting about some disaster. As usual, folks had no food or water; their houses and businesses were destroyed. At the end of the segment, the commentator asked what do the people affected by the disaster do next.
Easy!
They focus on the priorities and improvise as needed.
Air
Shelter
Water
Food
Protection, Medical, Clothing, Communications, Transportation, and ... until everyone is safe or buried.
Before I begin, if you think a violent collapse will never happen, I need for you to stop reading. Instead I want you to click on the above links, read the past articles, and get started on your family's preps.
For those folks planning for a possible violent collapse, let's begin.
Living in a typical "stick built" home during a violent collapse could be a death sentence for you and your family. These homes are easily destroyed by fire and offer little ballistic protection for your family. Plus, a typical home is ill-suited for mounting a defense against marauders.
Now, some folks will suggest that you download and read FM 5-103 "Survivability" and FM 90-10-1 "An Infantryman's Guide to Combat in Built-Up Areas" These field manuals, from these United States Army, will instruct you on how to fortify a home to withstand an attack. These manuals will tell you to place sandbags (they should be filled with soil not sand) to protect you and your family while shooting. This is good advise, but ...
I had a buddy do this during his military tour in Berlin. His platoon (about 20 people) was told to fortify a two-story wooded building, just like your home, according to FM 5-103 and FM 90-10-1. He said once they were finished; they couldn't go into the building until they had reinforced the floors, walls, and ceiling with timber supports because of all the added weight from the filled sandbags.
The next problem with staying in your home is your home isn't designed to be defended.
Let me explain.
You have obtained all the sandbags you and your family need, filled the bags with soil, reinforced your home's floors and walls, and have the sandbags properly stacked inside your home by the windows, protecting your family's firing positions.
Note: Make sure you have sandbags on all four sides of your firing position. Bullets will penetrate your home's walls, even the the walls behind you!
Once you have done all this stuff, you have to ask yourself the question: Do all the firing positions cover the whole house?
 |
| Dead Space Outside a Typical Home |
Probably not because a typical home is either a square or rectangle. These shapes prohibit defenders (you and your family) from shooting at the corners of the house. This dead space will allow attackers to be protected from your firearm's fire just because of the attacker's location. The attackers will then be able to have a safe place to attack your family.
So what's a very serious prepper or survivalist to do?
Build a home that can be defended.
Yep! If you think a violent collapse is likely, within your lifetime or your children's lifetime, you need to be building a home that can be defended from a violent attack. One design is a cross-shaped home.
 |
| Cross-Shaped Home for Better Defense |
Note: I apologize. I haven't explained the pictures. The lines coming from the middle of the drawing are the bullets' paths.
Notice, the difference between the two houses designs. The square/rectangle shaped house allows dead space to touch the home. The cross-shaped home makes the attacker move (walk, run, crawl) though a hail of bullets before reaching the house.
Next, the serious prepper or survivalist needs to ensure the walls of their home can stop bullets. The only product that I have found that can do that is ICF (insulated concrete forms), and ICF has a high insulating factor. (Because we still have to prep for power outages, bad weather, and lowering our fuel usage.) Your home should also have bullet resistant shutters covering the windows, at least on the lower floors, and a metal roofing system.
Now, some folks are going to say that I am f*cking crazy, (I am) but it's do able. Building with insulated concrete forms (ICF) only adds about 10% to the cost of a home. That cost is recouped from lower fuel bills and lower insurance rates (Remember, fire is the number one threat to preppers/survivalists) Plus, you can always build a smaller home. It will be easier to heat and defend.
And that leads to my next point.
Survivalists and prepper families don't have enough folks to effectively mount a defense of a typical home. A square or rectangular home should have two people on each side, 8 people. The cross-shaped house should have at least one person on each 'side' of the house. (Twelve 'sides' equals 12 people) during an attack. More people would be better, so any of the sides could be reinforced or a wounded person replaced.
Heck, most preppers and survivalists don't have enough people to effectively have a 24-hour observation team of two people. (LP/OP in military speak).
Note: I might write about LP/OPs in a couple of months.
My brothers and I have talked about this issue. We have several suggestions.
The first idea we talked about was to look at the Scottish clan model. Members of an extended family, related by blood and marriage work together to build a fortified home. The 'home' place is large enough to allow for the 'clan' to expand, if needed during an emergency.
Another idea is for one family to build the place and 'invite' others (friends, close relatives, coworkers, and ...) to come on down during a disaster. The invited folks may or may not be required to cache supplies.
The last idea, I'll mention, is a combining of the first two ideas. A group of friends build a fortified place, together. Each family is required to provide support for the group (buildings, water well/water catchment, and other projects) and for themselves (food, guns/ammo, and a whole lot of other stuff)
All three ideas have their pros and cons, but all three might not work for those folks planning for a multigenerational event. Those folks are going to have livestock, and livestock needs to be protected.
One idea from history, on at least three continents and one island, is the fortified farm. France, South Africa, these United States, and England offer examples for us to look at.
In South Africa, there is one fortified farm house that I would like to highlight. It is called Barville Park. It has a two-story house, a two story barn, and a 6 to 8 feet high wall connecting them.
A home like this could be built in three stages.
 First the house, as I mentioned earlier, the house would be a two-story home with thick concrete walls, bullet resistant shutters covering the lower story windows, and a metal roof.
In one description of the Barville Park farm, the walls of the house are over six-feet thick.
 The next step would be to build the barn. Just like the house it would have thick walls, and all first story windows would be on the inside facing the future courtyard.
Possibly, just like the block houses, the barn would have an overhang that would allow folks to shoot along the walls, stopping any attackers from getting close to the wall.
 Lastly, or the second step, would be to build a wall. The wall would be only one and a half stories tall. The wall would be as thick or thicker then the walls of the barn.
Needless to say, any gate would have to be strong enough to prevent villains from ramming through it.
I would like for you to notice that the house and barn are offset from the wall. This allows you and your family to shoot, from loopholes on the first floor or small windows on the second floor, along the wall
 Of course, there is a flaw in this design. Unless you have an overhang, like the block houses, for firing at the two corners, dead space touches your home and barn.
Remember, dead space allows an attacker protection from your weapons.
OK. Before I leave, I would like to talk to you about walls. I like walls for a couple of reasons. First, they slow down attackers. Second, if they are thick enough, they stop bullets. Lastly, they can look very cool, as in castle cool.
But you have to be careful.
 Walls should never be taller then your home. Walls taller then your home allow villains to shoot into your home from the wall.
It's the same principal as your home should be on a hilltop or a rise (the highest point in the immediate area)
The French forgot this when they were building their big military base at Dien Bien Phu, in the 1950s.
 Next, walls should have a place that allow you or your family to fire over or through the wall from a protected place. On castles, they are called crenelations. They are the saw-tooth looking things on top of castle walls.
Or
You could make something like arrow-loops. They are holes in the wall that allow defenders to fire arrows (you should be using firearms) from a protected position.
 Lastly, at least about walls, the walls should be taller then a standing person, but you won't be able to fire over it. One way of doing that is having a firing step.
When you want to fire, you step up, fire, and step down. This will protect you from return fire. Plus, you can move to a different firing position without bring seen.
That's it, for now.
Before I go. Some folks will think I'm crazy (I am) for suggesting that you and your family build an elaborate fortified home.
Hey, it's your choice how much you get prepared for the disasters you and your family are preparing for, but ...
Remember!
If you think something bad is going to happen, and you do nothing about it. You really don't believe; it could happen.
Definitions/Acronyms:
LP/OP - Listening Post/Observation Post
Link:
Global Security - FM 5-103 Survivability
http://www.globalsecurity.org/military/library/policy/army/fm/5-103/index.html
Duffer's Drift - The Defence of Duffer's Drift
http://www.angelfire.com/oh5/duffersdrift/
Wikipedia - Insulated Concrete Form
http://en.wikipedia.org/wiki/Insulating_concrete_form
Wikimedia Commons- BoerWarBlockHouse SouthAfrica.jpg by Danie van der Merwe
http://en.wikipedia.org/wiki/File:BoerWarBlockHouse_SouthAfrica.jpg
Wikimedia Commons - Burgersdorp: Sentinel 001.jpg by Leo za1
http://commons.wikimedia.org/wiki/File:Burgersdorp-Sentinel-001.JPG
Wikipedia - South African Farm Attacks
http://en.wikipedia.org/wiki/South_African_farm_attacks
Artefacts.co.za - Barville Park, Details
http://www.artefacts.co.za/main/Buildings/bldgframes.php?bldgid=9383
Visit Cumbria.com - Fortified Towers and Houses in South and East Cumbria
http://www.visitcumbria.com/sl/south-cumbria-pele-towers.htm
About.com: Military History - First Indochina War: Battle of Dien Bien Phu
http://militaryhistory.about.com/od/vietnamwar/p/dienbienphu.htm
The Castles of Wales - Castle Terminology
http://www.castlewales.com/casterms.html
The last idea, I'll mention, is a combining of the first two ideas. A group of friends build a fortified place, together. Each family is required to provide support for the group (buildings, water well/water catchment, and other projects) and for themselves (food, guns/ammo, and a whole lot of other stuff)
 |
| Boer War Block House, South Africa (circa 1901) by Danie van der Merwe |
 |
| The Sentinel Blockhouse in Burgersdorp, South Africa by Leo za1 |
All three ideas have their pros and cons, but all three might not work for those folks planning for a multigenerational event. Those folks are going to have livestock, and livestock needs to be protected.
One idea from history, on at least three continents and one island, is the fortified farm. France, South Africa, these United States, and England offer examples for us to look at.
In South Africa, there is one fortified farm house that I would like to highlight. It is called Barville Park. It has a two-story house, a two story barn, and a 6 to 8 feet high wall connecting them.
A home like this could be built in three stages.

In one description of the Barville Park farm, the walls of the house are over six-feet thick.

Possibly, just like the block houses, the barn would have an overhang that would allow folks to shoot along the walls, stopping any attackers from getting close to the wall.

Needless to say, any gate would have to be strong enough to prevent villains from ramming through it.
I would like for you to notice that the house and barn are offset from the wall. This allows you and your family to shoot, from loopholes on the first floor or small windows on the second floor, along the wall

Remember, dead space allows an attacker protection from your weapons.
OK. Before I leave, I would like to talk to you about walls. I like walls for a couple of reasons. First, they slow down attackers. Second, if they are thick enough, they stop bullets. Lastly, they can look very cool, as in castle cool.
But you have to be careful.

It's the same principal as your home should be on a hilltop or a rise (the highest point in the immediate area)
The French forgot this when they were building their big military base at Dien Bien Phu, in the 1950s.

Or
You could make something like arrow-loops. They are holes in the wall that allow defenders to fire arrows (you should be using firearms) from a protected position.

When you want to fire, you step up, fire, and step down. This will protect you from return fire. Plus, you can move to a different firing position without bring seen.
That's it, for now.
Before I go. Some folks will think I'm crazy (I am) for suggesting that you and your family build an elaborate fortified home.
Hey, it's your choice how much you get prepared for the disasters you and your family are preparing for, but ...
Remember!
If you think something bad is going to happen, and you do nothing about it. You really don't believe; it could happen.
Definitions/Acronyms:
LP/OP - Listening Post/Observation Post
Link:
Global Security - FM 5-103 Survivability
http://www.globalsecurity.org/military/library/policy/army/fm/5-103/index.html
Duffer's Drift - The Defence of Duffer's Drift
http://www.angelfire.com/oh5/duffersdrift/
Wikipedia - Insulated Concrete Form
http://en.wikipedia.org/wiki/Insulating_concrete_form
Wikimedia Commons- BoerWarBlockHouse SouthAfrica.jpg by Danie van der Merwe
http://en.wikipedia.org/wiki/File:BoerWarBlockHouse_SouthAfrica.jpg
Wikimedia Commons - Burgersdorp: Sentinel 001.jpg by Leo za1
http://commons.wikimedia.org/wiki/File:Burgersdorp-Sentinel-001.JPG
Wikipedia - South African Farm Attacks
http://en.wikipedia.org/wiki/South_African_farm_attacks
Artefacts.co.za - Barville Park, Details
http://www.artefacts.co.za/main/Buildings/bldgframes.php?bldgid=9383
Visit Cumbria.com - Fortified Towers and Houses in South and East Cumbria
http://www.visitcumbria.com/sl/south-cumbria-pele-towers.htm
About.com: Military History - First Indochina War: Battle of Dien Bien Phu
http://militaryhistory.about.com/od/vietnamwar/p/dienbienphu.htm
The Castles of Wales - Castle Terminology
http://www.castlewales.com/casterms.html
Saturday, June 25, 2011
In the Beginning, ... Part 4
Dear Preppers and Survivalists,
Lastly, you need to make a plan of what you and your family are going to buy to help you survive a disaster.
Buying in a Spiral
First, a shout out to Spartan, my brother, he came up with this method of buying stuff.
The idea is to buy a little (or complete a task) each month in each of the different categories to help increase you and your family's chance of surviving a disaster.
An Example of Buying in a Spiral
February '11 - 6 tarps and 50 feet of nylon rope for an expedient shelter
March '11 - Ten 5-gallon water carriers then fill them with tap water
April '11 - Two week supply of canned, boxed, and bottled food
May '11 - SKS rifle and 100 rounds of ammo
June '11 - First-Aid kit, one your family builds
July '11 - One pair of walking boots for everyone
August '11 - Weather alert radio
September '11 - 5 sets of bicycle tire tubes and an air pump
October '11 - Backwoods Home anthologies, first year - 10th year
November '11 - $500 in an envelop, under the mattress
December '11 - Emergency kit for each car
the next year
January '12 - Family-sized tent
February '12 - Water filter (Katadyn or Berkey)
March '12 - 360 pounds (12 cases) of wheat from the Mormons
April '12 - SKS rifle repair parts and 500 rounds of ammo
May '12 - Extra prescription medicine
...
You get the idea.
The Reasoning Behind this Method
Buying in a spiral pattern allows you to buy a little bit of prepping supplies in each category, every month or week. This prevents you and your family from over-prepping in one area. Instead of having a multiyear supply of food but no firearms to protect the family, you and your family can eat for a month and protect yourselves, and treat a minor injury, and bike to the store, and make an emergency purchase, and ...
An Organization Tool
Needless to say, you and your family are going to need something written down to keep track of what y'all are going to buy over the next year.
One method is a basic grid.
What I did is take a sheet of paper and write down each item category.

Next, I add one or two items, the top priorities, under each heading.

As the year passes by, the plan is to buy one of these items each month.
PS.
Folks, depending on your financial situation, you may decide to make a prepping purchase every week, instead of every month, buy larger quantities, or buy less often. It's your choice.
PS, again.
Even though I focused on purchases, you and your family can use this method to identify skills or tasks that you want to learn or complete to increase your chance of surviving a disaster.
Saturday, June 18, 2011
In the Beginning, ... Part 3
Dear Preppers and Survivalists,
The next thing you are going to need to do is make an inventory of all your supplies.
Now, you need to do this in a secure fashion that means no spread sheets, no mobile devices, and definitely no 'cloud'
Yep, that means old-school, paper and pencil for this task, lots of paper.
Before you and your family begin, you are going to have to decide wether y'all are going to use an organized or an unorganized method.
If you have decide an unorganized method, stop reading and get to work. Now!
If you have decide an organized method, please, read on.
First, label the top of a sheet of paper "Air"
At the top of another sheet of paper "Shelter"
Another sheet "Water"
"Food"
"Guns/Protection"
"Medical/Health"
"Communications"
"Transportation"
"Clothing"
You get the idea.
Once all the sheets of paper are labeled at the top, pass them out to your family.
Next, you, your children, and your partner go around the house writing everything you own in that category on the paper. Remember, only the items your family owns.
An example might look something like this

and this

and this

and this

Note:
Folks, these are simple examples. You will probably have a lot more stuff to include on your family's inventory sheets
Once you and your family are finished with the inventory, you and your partner (and the children, too) go through all of the lists. Just like Saint Nick, you are going to check the lists, twice. If you forgot anything (how about that half-gallon of gasoline mixed with 2-stroke motor oil), add it to the list.
Next, you and your partner (the kids are probably tired by now) are going to line through any item that doesn't work/damaged. (your daughter's holey running shoes, your son's way too small jeans, your broken golf clubs, so on and so forth.
Once this is finished ...
Congratulations! Now, you know what you own, and you have a good idea of the supplies that you and your family have on hand for a disaster.
Plus, you can probably use this list for insurances purposes, if you include some pictures.
Saturday, June 11, 2011
In the Beginning, ... Part Two
Dear Preppers and Survivalists,
So you and I 'woke up.'
We looked on the internet, reading what we could, and trying to figure out what we needed to make our families safe. We started buying food that our families didn't like or food we didn't know how to use.
We went to the local gun store plunking down a month or two worth of pay to buy firearms we knew nothing about. If you were lucky, you had some military service and know about rifles but probably not handguns.
And the mistakes we made (and are still making) as we hurried to make up for shortcomings as the 'current' disaster reared its ugly head, but nothing happen. Oh, the jokes we heard from our friends and family that knew of our preparations
But we still prepare.
And this is what this blog is about.
So,
The First Step
I want you to get a sheet of paper; lined or unlined, it doesn't matter.
I want you to fold the paper in half, long ways (like a hot dog bun) Along the crease, that you made, draw a line separating the paper in half.
On the left-hand side of the paper, start listing all the potential disasters and emergencies you and your family could face.
 |
| A Short List of Potential Emergencies/Disasters |
Next, on the other side of the paper rank each potential disaster from 'most likely to happen' to 'least likely to happen.'
 |
| Ranking of Potential Disasters/Emergencies |
Next, add any disasters to the list that you and your family feel are important for y'all to get prepared for such as Zombies, nuclear war, or ... that weren't on your original list.
Please, if you add any disasters to the list, make sure you put them in the proper priority from 'likely to happen' to 'least likely to happen.'
 |
| Other Potential Disasters/Emergencies Added to the List |
Almost lastly, line through any disasters you and your family are unwilling to prepare for. For some folks, it might be nuclear war (too expensive) or home invasion (pacifist)
Note:
1) If you don't like this method, Richard De Castro has another method. I provided a link, in the link section of the post, to his excellent Threat Assessment FAQ.
2) FEMA has an excellent booklet titled Risks and Hazards: A State by State Guide. It is a state by state guide covering tornadoes, hurricanes, volcanoes, earthquakes, snow and extreme cold, tsunamis, nuclear power plants, and nuclear attack (the "Big One" not terrorists/small scale attacks). The booklet will give you an idea of the possibility of these threats for your state/region.
Link:
The Widening Gyre: Nick P. Norwood - Threat Assessment FAQ by Richard De Castro
http://dnausers.d-n-a.net/prepared/faq/assess_faq.txt
Survival Ring - FEMA-196 Risks and Hazards: A State by State Guide
http://www.survivalring.org/FEMA196-free.pdf
or
Scrib - FEMA-196 Risks and Hazards: A State by State Guide
http://www.scribd.com/doc/37577809/Risks-and-Hazards-FEMA-196
If you have children in grade school, they will be able to tell you about folding paper like a hot dog bun or a hamburger bun.
Saturday, June 4, 2011
In the Beginning, ...
Dear Preppers and Survivalists,
When did you wake up to the fragile nature of our complex society?
Was it urban riots like the one in Watts in 1964 or the one during the New York city blackout in 1977. How about the Miami riot in early 1980, another one again in Los Angeles in 1992, or was it the 2002 Cincinnati riot?
Was it a natural disaster such as a hurricane (Camille in 1962, Andrew in 1992, Katrina in 2005, the Schoolhouse Blizzard in 1888, the blizzard of 1978 and again in 2010, or the earthquakes 1811 in New Madrid, 1906 in San Francisco, or Northridge in 1994?
Was it a financial difficulty such as a financial depression, like the ones in 1857, 1929 and again in 1937, or maybe it was the recessions of '73, the early '80s, or the 90s?
Was it reading a book like Alas, Babylon in 1959, Warday in 1984 or One Second After in 2009 that put that nagging doubt in to your head?
Or is it a potential disaster that might be unfolding such as climate change, Peak Oil, the mass extinction of species, the massive volcano in Yellowstone, another New Madrid earthquake, or the collapse of the world's financial system?
Or could it be some fringe scenario like the Rapture in 2011, Mayan calendar ending in 2012, Zombies, or an alien invasion?
Either way,
Welcome to prepping and survivalism.
Link:
Wikipedia - Urban Riots
http://en.wikipedia.org/wiki/Urban_riots
Wikipedia - Hurricane Andrew
http://en.wikipedia.org/wiki/Hurricane_Andrew
Wikipedia - Hurricane Katrina
http://en.wikipedia.org/wiki/Hurricane_Katrina
The Post Chronicle - Biggest Hurricanes in History: The Top 14 Big, Bad Storms
http://www.postchronicle.com/news/original/article_212367849.shtml
Wikipedia - Schoolhouse Blizzard
http://en.wikipedia.org/wiki/Schoolhouse_Blizzard
Wikipedia - North American Blizzards of 2010
http://en.wikipedia.org/wiki/North_American_blizzards_of_2010
USGS - Largest Earthquakes in these United States
http://earthquake.usgs.gov/earthquakes/states/10_largest_us.php
The Amateur Economist - America's Great Depression: An Overview
http://www.amatecon.com/gd/gdoverview.html
Wikipedia - List of Recessions in these United States
http://en.wikipedia.org/wiki/List_of_recessions_in_the_United_States
Wikipedia - Alas, Babylon
http://en.wikipedia.org/wiki/Alas,_Babylon
Wikipedia - Warday
http://en.wikipedia.org/wiki/Warday
Wikipedia - One Second After
http://en.wikipedia.org/wiki/One_Second_After
Friday, May 27, 2011
Weapons
Welcome Preppers and Survivalists,
As some readers know, I enjoy science fiction. The genre allows writers to explore various aspects of our society.
One series of short stories, that I have enjoyed in the past, involves a bartender and his experiences tending a bar visited by many different alien species. One species, a quick and deadly predator, invites the bartender to lunch. (It's not what you think)
During the story, the visiting aliens easily catch their deer-like prey with sharp claws and quick reflexes as the human bartender always misses his prey until he picks up a femur (the long, thick, strong leg bone of an animal) and uses it to kill his prey.
As the bartender roasts his lunch over an open fire, he ponders the differences in evolution between humans and the aliens. The aliens evolved claws, speed, and quick reflexes to kill their prey while Humans evolved a brain with the ability to improvise or build something ...
to kill you.
You as a Weapon
Teeth, nails, fingers, elbows, knees, forehead, and ... are some of the weapons we carry with us every day. If you can reach someone, you can hurt them.
Remember though! That's true about them, too.
PS.
In a fight for your life, you have failed if you allow an attacked to get this close to you.
The "Things" Around You
On our most recent plane trip (We visited my partner's mom and dad) we went through security. Well, they had changed the signs from our last trip, and I wasn't paying attention, so I forgot to take off my belt. This caused an enhanced pat down and a search of my carry-on bag.
The security agent started going through my bag. As he looked through my bag, I started to realize all the weapons that I was carrying. Things like newspapers/magazines that could be rolled up and used as a blunt weapon; sharpened pencils/ball-point pens that could be used as stabbing weapons; and a thick heavy book in the carry-on bag itself that could be used as a club. (I almost forgot my key ring with the three big keys)
Needless to say, they let me on the plane with everything I was carrying and my belt, too (a garrote)
Close Weapons
Most folks are familiar with close weapons such as knives, swords, and spears. These weapons give you a little more reach then your hands and feet. Plus, they are sharp or pointy or sharp and pointy.
There is also another close weapon called a club. These weapon can be blunt or pointy and sharp.
If manufactured knives, spears, and clubs are unavailable, these weapons can be improvised. An improvised club can be as simple as your young daughter's baseball bat. To add to it's lethality a few nails pounded into the end turns it into an improvised morning star. (Watch the 1981 film Escape from New York or do a web search for "Nail-Bat")
An improvised spear is easy to make. Just find a stout tree limb (about 5 feet long) and sharpen one end. To make the point more durable fire-harden the sharpened tip by holding over a fire and slowly rotating the spear. Don't let the tip catch fire, though.
You can also improvise a metal tip for your spear using discarded metal. After you fashion the spear tip, split the end of the spear, insert the metal tip, then wrap the split end with cord.
To learn how to make an improvised knife, all you need is a little research on prison knives or improvised knives.
Primitive Projectile Weapons
Most of us know about bowes and arrows, but we forget about the others such as blowguns, Atlatl, slings, spears, and a multitude of other projectile weapons.
Modern Projectile Weapons
So many other writers have written about firearms (Which ones to buy, how to use them), but they have failed to make an important point.
Indirect Fire
It's funny to be writing about indirect fire until I remember a story from the troubles in the Angola/South Africa area during the '60s and '70s. A family of farmers were attacked by terrorists. The terrorists used mortars in the attack. The farming families had to harden/strengthen their homes' roofs with sandbags to protect themselves and their families from mortar attacks.
Lastly, The Important Points?
We will never get rid of weapons because humans are too imaginative.
The availability of weapons are limited by your inventiveness
Weapons are used to keep our friends close and our potential enemies as far away as possible
Link:
Judo: Information Site - U.S.M.C. MCRP 3-02B: Close Combat
http://judoinfo.com/pdf/USMCcombat.pdf
Global Security - U.S.A. Fm 3-25.150: Combatives
http://www.globalsecurity.org/military/library/policy/army/fm/3-25-150/index.html
Wikipedia - Knife
http://en.wikipedia.org/wiki/Knife
Wikipedia - Bowie Knife
http://en.wikipedia.org/wiki/Bowie_Knife
Wikipedia - Sword
http://en.wikipedia.org/wiki/Sword
Wikipedia - Mace (Club)
http://en.wikipedia.org/wiki/Mace_(club)
Wikipedia - Morning Star (Weapon)
http://en.wikipedia.org/wiki/Morning_star_(weapon)
Wikipedia - Pike (Weapon)
http://en.wikipedia.org/wiki/Pike_(weapon)
Wikipedia - Spear
http://en.wikipedia.org/wiki/Spear
eHow.com - How to Fire Hardened Wood Spears
http://www.ehow.com/how_6188823_fire-hardened-wood-spears.html
eHow.com - How to Make a Spear
http://www.ehow.com/how_2120634_make-spear.html
Sling.org Forum - General: Other Primitive Weapons
http://slinging.org/forum/YaBB.pl?board=other
Primitive Ways - Home
http://www.primitiveways.com/
Storm the Castle - How to Make a Spartan Spear (Hoplite Spear)
http://www.stormthecastle.com/how-to-make-a/spartan-spear.htm
Note: Yes, this link uses paper to make the spear tip but it gives you an idea of how to fabricate one out of metal.
Instructables - Prison Knife
http://www.instructables.com/id/Prison-Knife/
Don Rearic.com - Street Weapons from Romania
http://www.donrearic.com/romanian.html
KK.org - The Dangerous Beauty of the Shiv
http://www.kk.org/streetuse/archives/2006/08/the_dangerous_beauty_of_the_sh.php
FAS - Indirect Fire
http://www.fas.org/man/dod-101/sys/land/indirect.htm
Friday, March 4, 2011
Military Skills - Rigging Your Gear: LBE
Welcome Preppers and Survivalists,
First, I would like to point you to a few article, over at Total Survivalist Libertarian Rantfest, by Ryan. He makes a very good point that must be made many times.
Total Survivalist Libertarian Rantfest - New Rules For Your Money And Debt
http://tslrf.blogspot.com/2010/10/new-rules-for-your-money-and-debt.html
Total Survivalist Libertarian Rantfest - Ramblings On Finances
http://tslrf.blogspot.com/2010/10/ramblings-on-finances.html
Total Survivalist Libertarian Rantfest - Financial Preps for WTSHTF or Your Own Personal TEOTWAWKI
http://tslrf.blogspot.com/2010/12/financial-preps-for-wtshtf-or-your-own.html
Total Survivalist Libertarian Rantfest - Does Preparing For TEOTWAWKI Cover All Other Scenarios?
http://tslrf.blogspot.com/2011/02/does-preparing-for-teotwawki-cover-all.html
The point (at least the point I get) is that, more then likely, you and I will die peacefully in our beds, and all that military gear, load bearing equipment (LBE), rucksacks, rifles, military manuals, and ... is less important then being financially prepared with a balanced set of preps.
So why am I writing this article? He might be wrong, and this is what I'm interested in, for now.
So lets get started.
As a prepper/survivalist you and your family may have to take up arms to protect yourselves and your community, so you will need basic military skills.
The first skill I going to write about is rigging your gear.
Now, I will be writing about rigging a set of LBE (Load Bearing Equipment); however you can use these techniques with any gear, just not military equipment.
The first thing you want to do is gather your gear and the supplies you are going to need. For this article (your kit might be different) you will need
- - Gear - -
2 - ammunition pouches2 - canteen covers
2 - canteens
1 - canteen cup
1 - pistol belt
1 - first-aid pouch
1 - "Y" or "H" harness
1 - butt pack

- - Supplies - -
1 - "Sharp" knife1 - 550 cord or similar cord
1 - lighter or matches
1 - pair of pliers
Next, you are going to have to make a decision. The decision is whether to remove the metal buckles and clips on your gear or leave them in place. This is your choice.
Me, a former infantryman.
I would remove the metal buckles and clips. In my experience, they dig into your skin, come unbuckled or unclipped at inopportune times, and make noise that can attract unwanted attention.
Note:
Don't let me pressure you into doing this because it's your gear and it (your gear) will work with the buckles and clips intact.
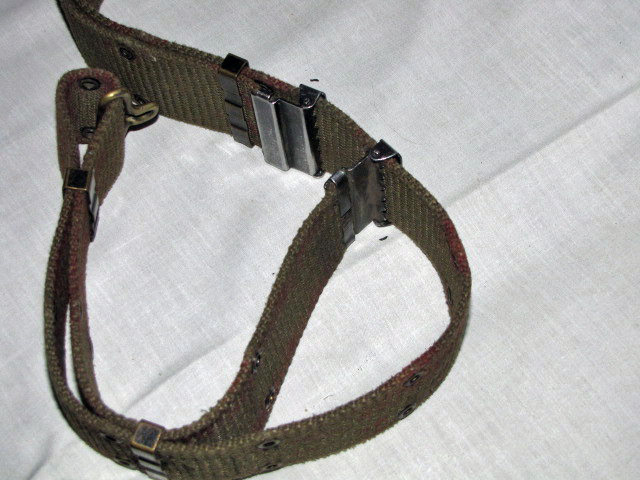
To remove the clips is simple. All you do is open the clips and pull them out. The buckles are a little harder. You will need to take the pliers and bend the buckles to undo them from the straps.
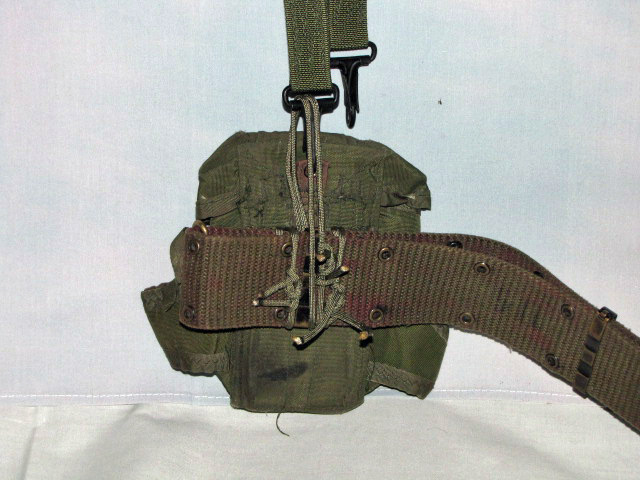
 |
| I broke the hook off before spreading the "ears" apart to remove the metal buckle |
Once all the buckles and clips have been take off, we are going to attach all of the gear to the pistol belt.
So, first, you put the pistol belt on and adjust it to your waist size.
Be Warned:
There are two sizes of pistol belt, medium and large. A medium fits up to a 34 inch waist, and a large fits up to a 44 inch waist so make sure you have the proper length. Plus, if you're going to wear a plate carrier or body armour, you need to wear this gear as you adjust the pistol belt.
Don't worry about those little sliders between the front and end of the belt, yet. We'll be adjusting them latter.
Now, take the pistol belt off and lay it on the table because we are going to attach the ammunition pouches.
Ok folks, because we might have two different methods (buckles/clips and no buckles and clips) I'm going to explain both.
Buckles and Clips
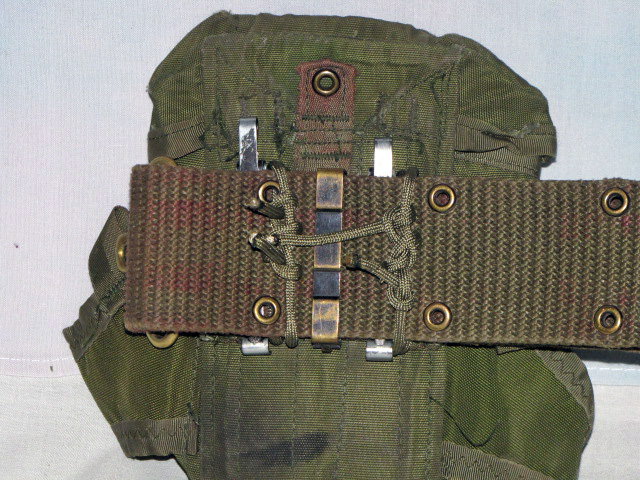
Position the ammunition pouches and clip the ammunition pouches onto the pistol belt then take a 20 inches (50 centimeters) piece of 550 cord and thread the 550 cord through the webbing on the back of the ammunition pouch. Loop the 550 cord around the pistol belt then thread the 550 cord though the ammunition pouch webbing, again this creates a double wrap of 550 cord through and around the pistol belt and ammo pouch. Next, I tie the 550 cord using a square knot and two half hitches. (The two half hitches "hold" the square knot) Lastly, I tie the other side of the ammunition pouch using the same method.
 |
| You can't see the first of two wraps, but it's there |
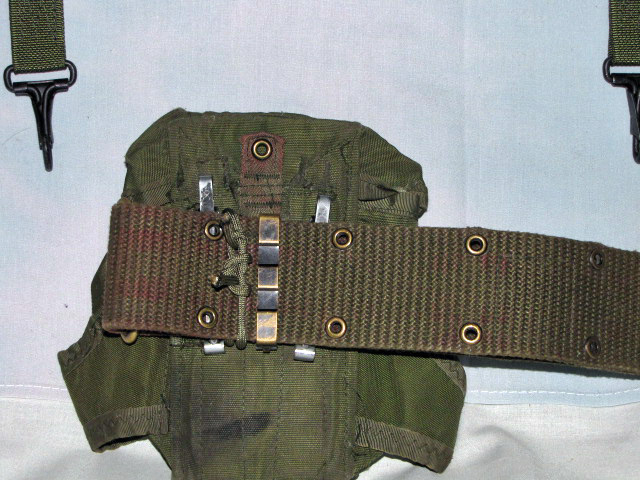 |
| One side completed. Another side to go |
 |
| Finished |
Removed Buckles and Clips
Position the ammunition pouches then take a 20 inches (50 centimeters) piece of 550 cord and thread the 550 cord through the webbing on the back of the ammunition pouch. Loop the 550 cord around the pistol belt then thread the 550 cord though the ammunition pouch webbing, again this creates a double wrap of 550 cord through and around the pistol belt and ammo pouch. Next, I tie the 550 cord using a square knot and two half hitches. (The two half hitches "hold" the square knot) Lastly, I tie the other side of the ammunition pouch using 550 cord.
I would like for you to notice the differences between the two methods. One method has the clips, and the other method doesn't.
Now, I know you're wondering why I tie both sides of the ammo pouches even though I have clips.
The reason? The clips may come undone, and the pouch will fall off and get lost, usually when you need them the most. (remember smart cords)
Next, do the other ammunition pouch just like the other.
Next, we're going to do the canteen covers. They are tied the same way as the ammunition pouches. Two loops through the covers and around the pistol belt and tied using a square knot finished with two half hitches.
I would like to take a break and talk to you about placement of the ammo pouches and the canteen covers. The ammunition pouches should be centered on your thighs, about one hand width from the main buckle of the pistol belt. The canteen covers should be about where your back pockets are on your pants.
The breaks over!
Next, you're going to attach the "Y" or "H" harness to the pistol belt. You do it the same way as the ammo pouches and the canteen covers except you're going to double loop through a strap then tie a square knot with two half hitches.
 |
| An ammunition pouch with no clips or buckles |
The next step is to attach the butt pack. By now you know what I'm going to write.
Two loops through the butt pack and pistol belt tied with a square knot and finished with two half hitches then do the other side the same way.
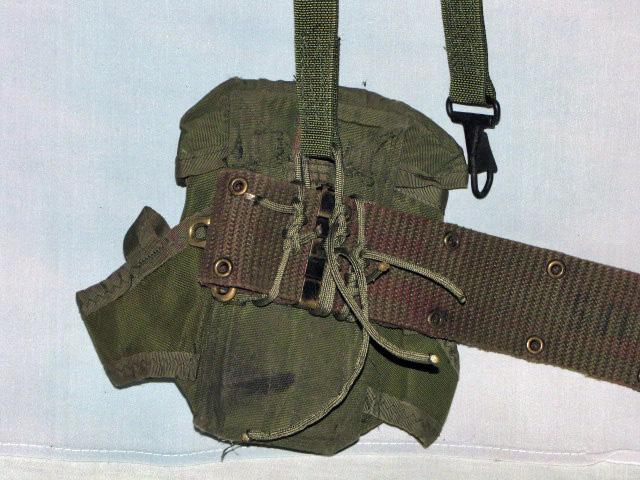
Lastly, we are going to attach the first-aid pouch. The pouch will be mounted to the "Y" or "H" harness on the non-firing shoulder. So, if you're left-handed, the pouch goes on the right side. If you're right-handed, the first-aid pouch will go on the left side of the harness.
 |
| The first-aid pouch shown open It is upside down to allow easy removal of first-aid dressing |
Yes, it's tied just like everything else, but the first-aid pouch is tied upside down.
Why?
It's easier to remove the bandage when the pouch is upside down.
Links:
U.S. Calvary - New Issue Pistol Belt
http://www.uscav.com/prod_7684_tabid_548_New+Issue+Pistol+Belt+
Note: U.S. Calvary has extra large belts for a 50 inch waist and an extra-extra large belts for over 50 inch waists.
U.S. Sailing - Square Knot
http://www.videos.sailingcourse.com/square_knot.htm
Animated Knots by Grog - How to Tie Scouting Knots
http://www.animatedknots.com/indexscouting.php
PS.
I finally added some pictures.
And
As always there are pictures that don't fit the narrative, so I have posted them below with some explanations
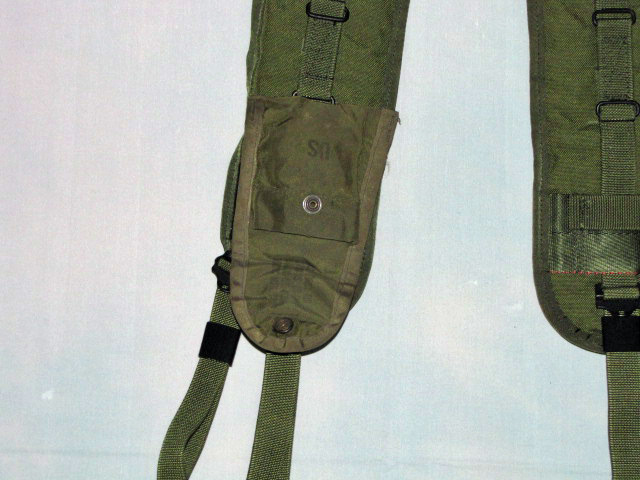
This picture shows the ammunition pouch and "H" harness tied together with it's original buckles but no clips.
Even though I used a square knot and two half-hitches, you can use any knot that will hold your gear in place. If you are using the clips and buckles.
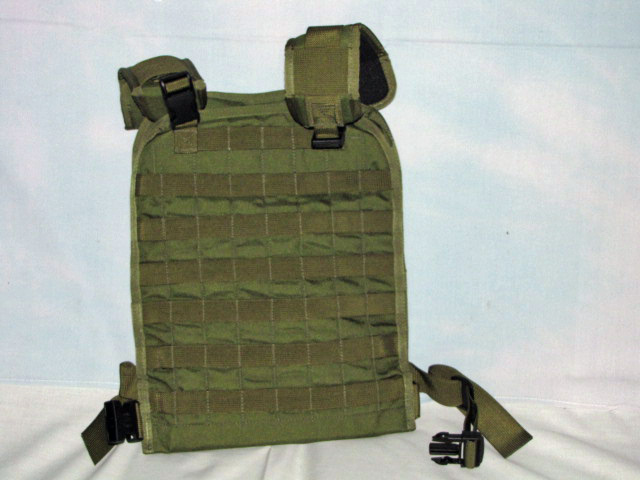
Notice the rows of wedding on this plate carrier.
The rows of webbing allow you to attach different pouches to the front and back of the carrier. You can use either the "old" metal ALICE clips or the "new" plastic malice clips.

On the left is an ammunition pouch using the "old" style of clips to attach to your pistol belt. They can still be used on MOLLE gear like the plate carrier above.
The ammunition pouch on the right uses the "new" style of plastic malice clips. As far as I know, if you're using "old" ALICE gear, the new malice clips will only work on the thin nylon strips found on the rucksack or butt-pack.
Friday, February 18, 2011
Survival Vest
Welcome Preppers and Survivalists,
After I got out of the Army, my folks suggested/wanted me to be a cop. They said it would be a good secure job.
I listened and told them "No way! I just spent part of my life with a target on my chest, and I wasn't going to spend the rest of my life with a 'shoot me' badge on my chest."
So, why am I telling you this?
Because wearing a military-style survival vest might put a target on your chest during a disaster.
Think about it, for a minute.
So what's a prepper to do?
Wear a vest! Just don't buy one that screams "SURVIVALIST"

My wife bought me this lined vest, from Duluth Trading Co., as a present for Christ's Mass. It has two hand warmer pockets on the outside. The pockets have little flaps that will help keep my gloves in my pockets when I'm not wearing them.

Above is a picture of the vest's inside. It has two big pockets (bottom, both sides) with zippers, two pockets (right side, top) with velcro tabs over the pockets, and three pockets (left side, top) two small ones and one large pocket.
Using the 3 to 5 Rules of Living, let's look at what might go in the vest.
Shelter - two to four large contractor garbage bags, 25 feet of 550 cord (large bottom pocket)
Water - two large freezer-style zipper bags (Ziplock bags) and a small water filter (large bottom pocket)
Food - a couple of snack bars, a few peppermints, a couple pieces of gum (top large pocket)
Protection - a folding knife (top right small pocket)
Fire - fire steel/metal match and some tinder (the other top right small pocket)
Needless to say, you will want to buy a vest that will blend in with your work environment because this vest won't work if you work in a big-city high rise office building.
Link:
Duluth rading Co. - Home
http://www.duluthtrading.com/
Note: Do a search for "Vest"
PS.
This is the type of vest I was talking about, from the Cowboy Action Shooting prospective, in Week Fifteen - Kit.
Subscribe to:
Posts (Atom)